10 October 2013

Upcoming events

Got some fun stuff coming up in the next couple weeks that LightWalker will be making a showing at...

First off, it's San Francisco Decompression on Sunday the 13th. I'll be there post brunch to hang out, dance, and enjoy the sights. Come sunset, LightWalker will stroll about and help light up the streets.


Then on Friday the 18th, I'm back in downtown Santa Cruz with the Museum of Art & History's GLOW Festival. It's a two night affair involving mostly fire on Friday and LED electronics and LEDs on Saturday. I'm being a rebel and will be there Friday cause they have more space that night and I want to go surf in Big Sur on Saturday. So, LightWalker will be walking the streets of Santa Cruz and dancing with Samba Stilt Circus and the Dancetronauts within the GLOW Festival from 7PM - 10PM.

Come join me!

06 September 2013

birth of the playa creature

LightWalker's true birth happened this past week in Black Rock City, Nevada on the playa of Burning Man 2013. I won't bother you with words...


12 August 2013

I'm a dragonfly!

OK, you have to watch the second video to get the dragonfly reference, but I like this first video for showing off the lights a little bit more:


This shows it a little more in action and how I'm going to actually be moving in it...


Overall, I am absolutely thrilled for how it's performing. Course, to get it to that point, I've done a ridiculous amount of work, hacking, and polishing. Maybe it wouldn't have been as big a deal if I hadn't burned three hours on Saturday messing with electrical connections and trying to figure out why the lights didn't work only to realize that my Arduino's battery was dying and causing the SPI signals to get lost. Fail.

Next step is to tweak some wiring that didn't quite work once on my body and finish the arm coverings. Then it's off that thing in the desert!

Happy happy :D

14 July 2013

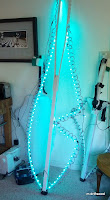
Wiring almost complete and one arm lit!

LightWalker

Have been able to spend a fair amount of time on the ol' LightWalker project lately. Pretty happy with how it's progressing...


  • Main unit is completely wired up at this point. All I gotta do is figure out where to mount the mic and how to insulate it a bit and that piece is done!
  • Both legs are completely done... frames, lights, wiring, and fabric covers.
  • Both arms have their frames built.
  • One of the arms has lights installed.
  • All wiring for accelerometers is complete.

First stroll!
A couple weeks ago, I actually wired the legs up, threw the battery and controller in a backpack, and hopped on the leg stilts to see how they worked. Definitely found some things that need polishing, but overall, the first walk went fantastic!

first arm
Here's the arm I got wired up with lights today. Now I just gotta get the lights on the other arm, finish wiring it, and it's on to my actual costume! I think I'm going to need to make an all white stilt outfit with 50 or so pixels in the legs to really make the whole thing work. Might even get a bunch of white fabric to hang off of me so I look more flow-ey.

The man burns in 47 days. At this rate, I might even have time to pack and get some food before I have to head out.

Cheers. Minty.

13 June 2013

First Leg (mostly) Completed!

I got pretty excited about getting this wrapped up tonight and am thoroughly happy with its initial look. It can only get better from here!


Next up is figuring out the final wiring and mounting! And finishing the other three legs of course...

07 June 2013

Total Control Lighting tips

I'm sure anyone reading this blog has noticed that I use a lot of stuff from Cool Neon. It all stems from a random meetup at a laundry mat with a fellow vanagon geek. It was raining out and I was making coffee and cleaning the inside of my van, Siobhan, while my laundry dried. Another van pulled up and we eventually got to chatting and checking out each other's rigs. The other fellow's van had Cool Neon RBG LED ribbon lighting covering the inside that was all controlled by a little remote control. I loved it. Instantly wanted to do the same inside Siobhan. That was about 2 years ago. I have failed miserably at that. *shrugs*
One of my life's loves... Siobhan

I was pretty impressed with what I saw and was pretty happy about my chance encounter. When I started having needs (yes, needs) for el-wire and more complex lighting, I turned to Cool Neon for the goods. So far, I've really liked working with a fun, bay area company; however, I have definitely learned some things about their products recently. Not bad things, just things a guy (or lady) would need to know in order to use them.

1. Controlling the lights

Total Control Lighting (TCL) is controlled over SPI. You can totally control the lights with straight Arduino C++ and not need any other software. You could also connect these lights up to *any* device that supports SPI. You do not have to use the Seeeduino that Cool Neon sells nor do you even have to use an Arduino compatible device. I haven't done it myself, but if you need more processing power and/or memory, you could even use Raspberry Pi. Or maybe the crazy cheap TI Launchpad?

Now, if you are using an Arduino compatible device, cool neon has some cool software to get you started. I definitely recommend using the TCL library from Chris De Vries. You can see it on his site or get it on github. It basically encapsulates all of the SPI controls and gives you simple functions like TCL.begin(), TCL.sendEmptyFrame(), and TCL.sendColor(r, g, b). Definitely handy.

If you're doing an LED Matrix setup for doing TV like effects and what not, they also have some handy Windows visualization software to help do your design. I have not played with this one much as I'm doing all my light effects driven by sensor inputs and algorithms as opposed to pre-stored "videos." This is a whole blog topic on itself...

2. Arduino shields, Arduino's, & SPI

As I mentioned, TCL uses SPI to communicate. Different Arduino devices use different pins for SPI!

You can read all the bloody (not as bad as the red wedding) details of Arduino's SPI implementation here. Specifically, check out the connections table a little past halfway down. It gives you the SPI pins for each Arduino model out there. Make sure to hook the TCLs up according to your device. The Seeeduino that cool neon sells is basically a Duemilanove (you need to know that for SPI stuff as well as working in the Arduino IDE). The Seeeduino Mega they sell is compatible with the Arduino Mega 1280 which uses different SPI pins (50, 51, 52, and 53 as opposed to the duemilanove's 12, 11, 13, and 10). I only had to switch from 11 and 13 to 51 and 52 when I switched from the seeeduino to an Arduino Mega.

Important! All of the above means that the shields that Cool Neon sells are *not* compatible with the Megas. They are connected directly to the duemilanove's pins and will not function on a Mega.

3. Power

Another tidbit I learned recently is that having multiple power sources -- one for your controller and one for your lights -- is a great idea!

When you do that, make sure to hook up the ground for the lights to the power supply for the lights *and* the controller's ground. I think Chris De Vries has a reference to this on his site and that's where I figured it out.

My understanding from Cool Neon is that the lights can be plugged directly into a power supply that's between 5V and 7 or 7.2V. I'm using a little 6V lead-acid deep cycle battery from batteries plus and it's working great.

4. Other Light Sources

So I don't feel too much like a little Cool Neon fan boy, I think I should mention that lights like the TCLs can be found elsewhere. I have not purchased any from other places as I like supporting a local, burner friendly company and the lights they sell have held up great for me. I also appreciate the customer service they offer.

I'm also becoming increasingly aware of the fact that a lot of cheap electrical components come from China and I do not like a lot of their labor or political practices (note that I have not looked into Cool Neon's component sources). Keep that in mind when you buy anything, but especially electrical goods. The cheap stuff is cheap! But, it usually comes from China and probably involves slave labor. If you want a good idea of how much decisions like this support the slave trade, check out http://slaveryfootprint.org.

[EDIT 13 Jun 2013] Just got a note from Cool Neon saying that they have been to the Seeed Studio factory in China that makes the arduino compatible boards they sell and that the factory conditions and ethics there seem top notch. Good to hear!

01 June 2013

SRAM... kabooom!

Crap. I just overshot the SRAM limit of the ATmega328 by a mile. Looks like I'm upgrading to the ATmega2560.

Man. I just ordered an enclosure that would fit my arduino too. Gotta find a bigger one of those too.

28 May 2013

She has a heart

This is not quite everything I wanted to get accomplished this weekend, but I did make some solid progress. All the electric components are soldered and working! In the process, I realized that I know nothing about soldering. Best lesson? Keep your soldering iron tip clean!

It took me quite a while to get everything drawn out and even longer to get it all soldered and working, but it was a great learning experience and super fun.

This is the entire unit... arduino, i2c multiplexing shield, equalizer shield, bluetooth breakout board, 4 ADXL 345 accelerometers, and an electret microphone. Only things missing from the shot are the 450 LED pixel points, the 6v 12Ah sealed lead-acid battery, and another battery to run this unit (I'm going to run the lights and controller off of separate batteries).

LightWalker's guts.


This is the i2c multiplexing shield with TCA9548A i2C switch. It allows me to hook up the 4 accelerometers that all have the same i2c hardware address to a single i2c line. The board can handle up to 8 units with the same address, so maybe I should do a spider for next year?
The big trick here was that I hooked up my SCL and SDA lines to where they were printed on the board but failed to realize that the board didn't connect those to the arduino's analog 4 and 5 pins like my board needed. I think newer boards would work through the stackable headers and the SCL and SDA holes printed on the board. Once I realized I was working with an older setup and re-routed them, all was good.


bottom of the i2c multiplexing shield
top of the i2c multiplexing shield


Here's the equalizer shield. I'm only using one of the  MSGEQ7 chips on here for a single audio channel, so it's kind of overkill, but it does give me a nice stackable shield and pins to hook the microphone and bluetooth to.


equalizer shield w/
electret microphone


And, just for completeness, the arduino compatible shield from seeedstudio...

the seeedstudio arduino
compatible board I'm using


24 May 2013

Inappropirates now on Instagram

Can you be a hipster if you're late to the party?

We promise not to post pictures of our food.

http://instagram.com/inappropirates

Motivation Vitamins: Maker Faire

400 total control lighting pixels!
Wow, have you guys ever been to the maker faire?! It is amazing! Highlights include stilting around with the Stilt Factory crew, watching the life size mousetrap, listening to Arduino founder Massimo Banzi talk about what Arduino's working on, and chatting it up with Cool Neon.

Stilt frame sketches
And check out the little self-Santa'd Christmas present I got from Cool Neon this week! Oh yeah. I've completed the design for my stilt frames (check it out below) and will be building them out over the long weekend. And these bad boys are gonna be set into the stilt frames about every inch and a half. Thing's gonna light up like Vegas!

09 April 2013

bringing the beats

shot of the horribly messy
prototype hardware
Getting audio working on Lightwalker has been a huge pain. I played around with a few electret microphones (like this guy from sparkfun) and had some bad luck with getting it to do what I wanted. In fact, I couldn't get it to do anything worthwhile. I even went as far as switching to using my android phone as the microphone and sending volume commands to my arduino over bluetooth. Doing so requires you to calculate root mean square and count zero crossings and all sorts of audio processing that I haven't done before. Was really cool to play with and tweak. But, in the end, doing the calculations in software and sending over bluetooth turned out to be way too slow.

I ended up landing on using a spectrum shield from sparkun in conjunction with their electret micrphone breakout board. Thought the whole thing was shot when I got it. And then I realized their documentation is incorrect and you have to run the mic at 3.3v instead of 5v. Has been great since I switched it. I might end up switching to just using an MSGEQ7 instead of the entire shield, but this is fine for now.

Another challenge I ran into was trying to figure out how to make it deal with the quiet of deep playa and being on the edge of a major sound camp. Once again, moving averages to the rescue! By keeping a moving average, I can compare the current volume to the average and adjust what the peak is as I go. So, moving from a quiet environment to a loud one or vice-versa will allow the lights to react visually well in both settings.

Check out the video. The lights and music are a little more synchronized in real life, but you get a good idea.


24 March 2013

Arm stilts. Engaged.

tall shadow walking
Took a break from the electronics today to turn the wooden crutches I found at the second hand store into arm stilts. Kinda nice to see that piece come together and be able to walk around on all four limbs three feet off of the ground.

The construction is super simple. I literally just unbolted the bottom of the wooden stilts and bolted in a five foot 2" x 2" with some homemade rubber feet on them. Spent about 30 minutes cruising around the park to check it all out. Overall I'm psyched. But, I'm definitely gonna have to put in some practice time as the arm stilts are fairly heavy and it's definitely a chore to keep them lifted most of the time. Will have to re-think whether or not wood's the right material for this.
bought crutches w/ custom stilt leg

19 March 2013

multiplexing working!

The TCA9548A soldered onto a
Schmartboard w/ male pins
Surfing, scuba diving, swimming with turtles, and downing boat drinks in Hawaii must go a long way towards making one smart and productive cause I've only been back from Hawaii for 24 hours and I've already finished a book (Something Wicked This Way Comes), got 8 hours of sleep, worked for 8 hours, ate two tacos, and gotten my multiplexing chip working!

I posted a while back about getting the TCA9548A I2C multiplexing chip and the Schmartboard and just now finally got it all soldered up and tested it out. The soldering was ridiculously easy for a chip this size. Got to hand it to Schmartboard for finding a slick, easy to use design. Literally took me 10 minutes from start to finish including heating up the iron and soldering a test chip. In retrospect, I should have soldered female connections onto this board or even gotten the Schmartboard arduino shield, but I'm definitely a noob and this is what happens. It'll work for now.

The longest part of the whole ordeal was figuring out how to wire the thing up, but in the end, I got it all working and was even able to hookup two ADXL-345 accelerometers to it and get readings from both. Again, the main point of this chip is that I want to hook 4 accelerometers up to my board over I2C but all the accelerometers have the same I2C address hardcoded. So, with the TCA9548A, I can control which one I'm talking to at any point in time.

Here's the sample Arduino sketch I threw together to demo things:
#include <Wire.h>
#include <ADXL345.h>
#include <SPI.h>
#include <TCL.h>

#define TCA9548AADDR 0x74 //1110100

// For now, one object works...
ADXL345 adxl;
unsigned long lastStatus = millis();
double xyz[3];
 
void setup()
{
    Serial.begin(9600);

    Wire.begin();

    Serial.print("initing adxl0...");
    selectI2CChannels(0x1);
    adxl.powerOn();
    Serial.println("done");

    Serial.print("initing adxl1...");
    selectI2CChannels(0x2);
    adxl.powerOn();
    Serial.println("done");
}
 
void loop()
{
    unsigned long currentTime = millis();
    bool printStatus = false;

    if (currentTime > (lastStatus + 500))
    {
        printStatus = true;
        lastStatus = currentTime;
    }

    selectI2CChannels(0x1);
    adxl.getAccelemeter(xyz);
    if (printStatus)
        printXYZ("ONE");
 
    selectI2CChannels(0x2);
    adxl.getAccelemeter(xyz);
    if (printStatus)
        printXYZ("TWO");
}
 
void selectI2CChannels(int channels) 
{
    Wire.beginTransmission(TCA9548AADDR);
    Wire.write(channels);
    Wire.endTransmission();  
}

void printXYZ(char label[])
{
    Serial.print(label); Serial.print(": ");
    Serial.print(xyz[0]); Serial.print(",");
    Serial.print(xyz[1]); Serial.print(",");
    Serial.println(xyz[2]);
}
Credit for being able to figure out the code and switch between the two accelerometers should go to Kerry Wong as the basis for my test is from his blog.

I'm pretty excited about things at this point, they are really starting to come together. I think I'm past due for a cool video update showing a lot of what I've done come together. Back with that as soon as I can...

17 February 2013

multiplexing hardware


TCA9548A and a dime. Yes, I have
to solder that to a circuit board.
So... I got this chip in the mail from Texas Instruments the other day (if you ask nice, they will ship you free samples...). Looks cool, but it's not even half the size of a dime! How the hell am I supposed to solder each little pin coming off of this damn thing?!

The chip is the TCA9548A 8 channel I2C switch. It was recommended to me by Kerry Wong on his blog article about multiplexing I2C chips. The point of the chip is to be able to connect 4 of my ADXL345 accelerometers to the single I2C input line on the arduino. Now the whole point of I2C is to be able to connect multiple sensors to a single set of input lines; but, to do this, the sensors all need a unique hardware address. My accelerometers all have the same address, so I have to put the TCA9548A in between my I2C input lines and my accelerometers. The TCA9548A allows you to select one pair of input lines as the line to listen to (one out of the 8 supported that is).

28 pin 0.65 pitch TSSOP compatible
prototype board from Schmart Board
I made a quick trip to the local electronics shop and to Radio Shack and all the prototype circuit boards I could find looked like a rhinoceros compared to my little ant of a chip. A little ol' googling of the interwebs led me to SchmartBoard, a little company up in San Ramon that makes prototyping circuit boards that noobs like myself can use to deal with chips this small (That's a Thin-Shrink Small Outline Package or TSSOP for those in the know). And it turns out I was cruising the motorcycle right by their shop on business the next day! So, I stopped in and met up with Neal Greenberg, the VP of sales and marketing. Neal was fantastic and gave me the run down on what I needed to do and hooked me up with this little SOIC prototype board that will fit my TSSOP integrated circuit perfectly.

My next battle is that I've gotta find a soldering iron conical tip with a point that's smaller than 0.65 mm...

14 February 2013

Android, bluetooth, and arduino oh my.

[most of this was originally written and posted to FB on 10feb2013]

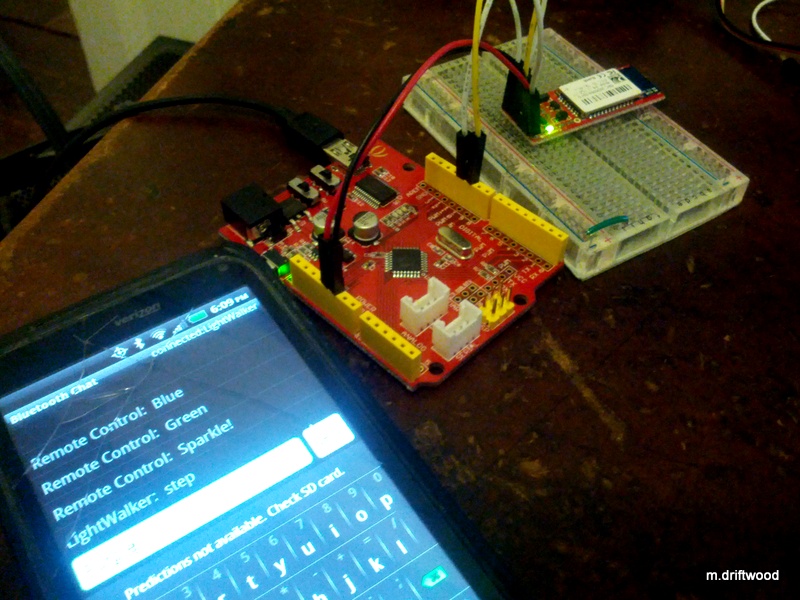
An onslaught of anti-social sentiments from an overly active couple days coupled with a ridiculous amount of caffeine spurred quite the productive Sunday. What you see here is an android powered HTC incredible 2 (AKA my playa calendar that tells me when to go to what event), paired with a BlueSMiRF bluetooth modem hardwired to a seeeduino v2.21 (basically an arduino). The phone is showing a prototype chat application I wrote that allows me to communicate with the arduino over bluetooth.

This is cool cause it proves that my phone can be used to control my entire suit! So, from my droid, I can tell my entire costume to change from green to purple or switch from being gravity sensitive to being sound sensitive. I'm pretty psyched because this means I (or you!) can change a lot of things about my suit while I'm out wandering the playa and I'm not stuck with just a handful of hardware switches controlling a limited set of options. The flip side is that my arduino can also send real-time info to my phone. With that, I can see the sensor data in real time and have an easier time of figuring out how to make the lights react the way I want.

Most of what I'm doing is on github. The android app I'm showing is here: https://github.com/gerstle/LightWalker/tree/master/tests/android/BluetoothChat and the code that's communicating back and forth with it on the arduino is here: https://github.com/gerstle/LightWalker/tree/master/tests/arduino/bluetooth

Next step? I'm about halfway through creating the first shot of my android app that will control the costume. I've also got all the material I need to make my first modified stilt setup. Well, not all of it... I still need to find some almost see-through white spandex or something. Anybody got any ideas?

13 February 2013

first bit of hardware received

Cool Neon toys.
About three weeks back, I got my first bit of goodness related to the LightWalker project -- some killer RGB LED lights, an arduino compatible board, and a developer's shield from Cool Neon  (AKA Funhouse Productions) out of Oakland. I have done a lot of software in my day, but pretty much have zero experience with hardware. I've done a little bit of el-wire soldering along with soldering it onto fabric, but the last time I hooked up an LED to anything and made it turn on and off was roughly 1998. And that was only done like three times to pass my assembly language class.

It took about 30 minutes of mucking around on the interwebs before I had the arduino IDE up and running and made the lights dance. I was hooked! Well, after I made it so I could edit my sketches in Vim instead of the standard editor.
playa coat froggy.

The worst part of getting this stuff and starting to use and understand it was that I soon realized I needed a lot more electronic gear. And sensors! And wires and breadboards and yeah. The local electronics shop failed at all of this; however, radio shack actually saved the day. The local radio shack actually has a lot of cool arduino related stuff and some decent starter kits. Even though some of it looks suspiciously like re-branded versions of stuff from Seeed Studio.

[The only other "electronic" stuff I've done in the last 10+ years is this tree frog climbing up the back of my playa coat. Coincidentally, also done with hardware from cool neon. Where's a rad place to get stuff to make cool things?]

Long story short, within a week I had an ADXL-345 triple axis accelerometer breakout board hooked up to the whole thing and could fairly accurately detect when a step was taken by measuring the g-force applied to the accelerometer against a moving average baseline. Point being, when I walk, pretty lights sparkle every time I take a step. I also realized that having an accelerometer on each limb introduces a lot of potential for some fun light shows. I'll leave you with this example of it's goodness...


12 February 2013

LightWalker is born!


I started playing with stilts last summer in prep for Burning Man 2012. In the last nine months or so I've had a fantastic time dancing with The Samba Stilt Circus, wondering around in a kilt on stilts (Kilts & Stilts!), and generally just being a circus monkey as much as possible.

As the new year rolled around and Burning Man released this year's theme, The Cargo Cult, I started thinking about creating some kind of tall, four-legged stilt monster costume to go with that them. I also wanted it to be a night time thing. That requires lights. When I started thinking about lights, I went straight to wanting to make the lights interact with my walking. Eventually this led to me scrapping the alien monster idea and going straight to a huge light display four legged stilt costume.

And so, LightWalker was born!


I've already started in on a lot of it and have some cool stuff to show. I will post most everything here and catch the blog up soon!

11 February 2013

Inappropirates.

Inappropriate. But harder to say when you've been drinking.

We were born from a random comment uttered by Jeff over dinner with friends at the 2nd Street Bistro back in October of 2012. His desire was to have a shirt with "Inappropriate" written across the front of it for his birthday that weekend. I'll let the pictures explain the rest...


jeffe


minty.


darren.
scott.

Who are the Inappropirates?! There's a little inappropirate in all of us.